Wednesday, July 30, 2014

DIY Kitchen Re-Do with Subway Tile Backsplash

Here it is! Our kitchen is DONE! (Well once we decide on drawer pulls and install those, we will really be done.) But for now, we are done! After staining our cabinets, we had granite installed from Lowe's, put in our own white subway tile backsplash, and ran a thin bead of clear chalk where the subway tile meets the granite. The hardest to do by far was the subway tile backsplash. In fact, if we never have to tile anything ever again, I would be fine with that. Two Type-A perfectionists and subway tiles that need to be cut and maneuvered and spaced the same, was hard for us. But we powered on through and finished this project in a day. Grouting was easy, we did that the next day and it took all of 30 minutes.

If you are considering doing your own backsplash, we bought all our supplies at Lowe's and rented a water saw from a local power tools place for $44/day (we only needed one day). I'm so glad Kyle was here to do this with me, because having a huge saw inches from your eye to cut tile, scared me. So, Kyle was in charge of that!

Phase II: Granite and Sink Installation

*We had to have a Plumber come before the granite could be installed to turn off the water in the sink and dishwasher. We also had to purchase a new garbage disposal (ours was pretty old and the rubber was worn out) and a new faucet. The granite we purchased came with a sink, there were many to choose from. We went with a deep banjo sink and are incredibly happy with it! Also, you need to schedule a plumber to come out the following day after your sink installation because it takes 24 hours for your sink to dry, it is glued to the bottom of the granite. The plumber will hook up your new faucet, disposal, and dishwasher.

 Before picture of laminate countertops

 New granite!


 Granite up-close on island

Banjo sink with Delta Ashton faucet

Phase III: DIY Subway Tile Backsplash

Supplies Needed

- notched trowel
- level
- Mastic
- tile spacers, we used 1/8"
- level
- speed square
- ceramic tile cutter
- water power saw
- subway tiles (we used around 200)
- grout, we used DeLorean Gray color
- grout trowel
- grout sponge
- clear silicone chaulk 

1. Find a starting point for your tiles, we started in the middle of where our stove would sit, but ended up tearing all that down and starting on the far left side and moving from left to right. It is easier to cut tiles in half using a ceramic tile cutter. 
2. Draw a straight line with your level where you want to start. Cover area with Mastic using your notched trowel and ensure there are lines from the trowel indented into the adhesive. Apply your tiles firmly. Use your tile spacers as you place your tiles up.
3. As you apply your tiles, make sure you plan for areas that will need cut tiles, such as electrical outlets. Using a speed square to mark off your cuts will help you when cutting the tiles with the wet saw or ceramic tile cutter.
4. Once you have allowed your adhesive to fully dry, apply your grout. Our grout came pre-mixed and did not need a sealer. 
5. Using a grout trowel, apply your grout at a 45 degree angle to ensure it gets in between your tiles. 
6. We did this in 4 sections, taking the time to wipe away the excess grout with the grout sponge that was damp with warm water. This will help your grout to adhere between the tiles. Our grout looked light grey during this step, but ended up drying much darker.
7. Once the grout has dried according to its directions (usually 24 hours), apply a thin bead of clear silicone where the granite and subway tiles meet to keep water from getting behind the cabinets and causing damage.

 Left: Ceramic tile cutter, Right: Type 1 Mastic tile adhesive

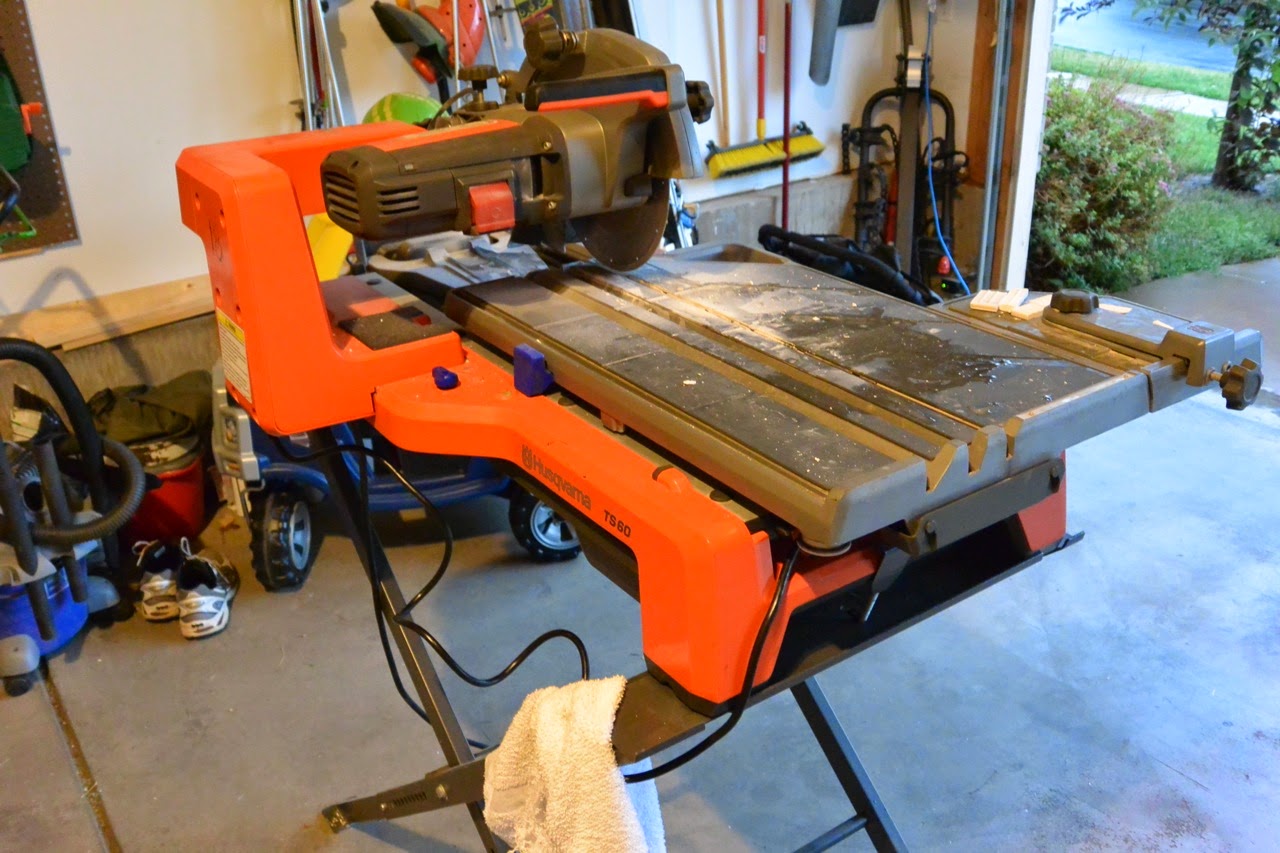
Wet Saw in our garage

 Center point where we started our tiles (changed later...)

 Applying Mastic with notched trowel

 Subway tiles with tile spacers

 Tile cuts made with wet saw to fit around outlets

 Finished - tiles are drying!

 Subway tile backsplash complete

Subway tile backsplash

 Applying grout with grout trowel and finger

 Grout looks light gray

 Difference between tiles with grout and without

Going over tiles with damp towel after using the grout sponge (yellow sponge in lower left corner)

 Clear silicone

 Applying silicone where granite and tiles meet

 Clear bead of silicone

Silicone seal after we went over it with a damp finger to wipe away excess (read directions on your silicone tube)

 Kitchen complete!

Stained cabinets, subway tile backsplash, and gray grout

Enjoy!
Brittney

Tuesday, July 29, 2014

Blueberry Muffin Overnight Oats

What's for breakfast? Delicious, cold, blueberry muffin oatmeal is! This recipe is super easy and you make it the night before and just serve cold in the morning. My boys loved it! I just quadrupled the recipe - I actually had to transfer the recipe to a different container after the below picture to fit the blueberries. Enjoy!

Blueberry Muffin Overnight Oats (1 serving)

- 1/2 cup old fashioned oats
- 6 oz. blueberry greek yogurt
- 1 tbsp. vanilla pudding mix
- 1/2 cup vanilla almond milk, or low-fat milk
- 1-2 drops vanilla
- 1/2 tsp. cinnamon
- fresh or frozen blueberries

1. Combine all ingredients and mix together. Place in the fridge overnight. Serve cold.

Overnight Oats in a Mason Jar

Enjoy!
Brittney

Monday, July 28, 2014

Bulgogi


When I was younger my family had the opportunity to live in Okinawa, Japan for three years. We visited Thailand and Korea while we were there and my family developed a love for Asian/Oriental cuisine. A famous Korean dish of marinaded steak is called Bulgogi. Delicious. I am sharing with you a family recipe - although I did add the soy sauce. I feel the marinade was more of a rub and needed a liquid to help coat the steak as it marinated overnight. I hope you enjoy this dish!

Ingredients

- 1 lb. sirloin steak
- 1 1/2 tbsp. sugar
- 2 tbsp. chopped scallions
- 1 tbsp. garlic, minced
- 1 tbsp. sesame oil
- 2 tbsp. sesame seeds
- 3/4 tsp. black pepper
- 1/4 cup soy sauce
- 2-3 carrots, shredded

1. Mix all ingredients together and cut steak into strips. Pour marinade over steak and allow to sit for 3 hours, or overnight.
2. Grill meat or cook in a large pan. Serve over rice.

 Cooking marinaded steak

Bulgogi over rice

Enjoy!
Brittney

Monday, July 21, 2014

Chicken Meatballs in Parmesan Sauce

I recently saw someone post that they had meatballs in a parmesan sauce at a meatball restaurant - who knew those even existed?! Anyway, it put me on a quest to search for a similar recipe. I came across this recipe and it turned out really well. My kids ate everything off their plates. I couldn't believe it! Please try this recipe - you won't regret it!

Kinley kept saying, "Mommy, these meatballs are GOOD!" Kid approved.

Chicken Meatballs in Parmesan Sauce

Ingredients {Meatballs}

- 1 lb. ground chicken
- 1 egg, beaten
- pinch of salt and pepper
- 1 tsp. garlic powder
- 1 tsp. paprika
- 3/4 cup breadcrumbs
- 2 green onions, chopped
- 3/4 cup parmesan cheese, shaved

Ingredients {Parmesan Sauce}

- 2 tbsp. olive oil
- 2 tsp. flour
- 1/2 cup onion, chopped
- 1 x 14.5 oz. can chicken broth
- 1/2 cup heavy cream
- 3/4 cup parmesan cheese, shaved
- salt and pepper to taste
- prepared egg noodles

1. Combine all meatball ingredients and form 1 inch round balls. Place on a foil lined and greased baking pan. Bake at 350 degrees for 15-20 minutes.
2. Prepare parmesan sauce by sautéing onions in olive oil in a large skillet. About 5 minutes.
3. Sprinkle flour on top of onions. Whisk in chicken broth and heavy cream.
4. Turn your heat down to low and add the parmesan cheese and a pinch of pepper.
5. When meatballs are cooked, add them to your sauce and allow to simmer for 10 minutes.
6. Serve over egg noodles.

Baked Chicken Meatballs

Evolution of Parmesan Sauce

 Egg Noodles

Chicken Meatballs with Parmesan Sauce with a side of roasted veggies!

Enjoy!
Brittney

Thursday, July 17, 2014

One Pot Thai Curry

My family loves Asian food and I love curry! This was an easy dish to make and didn't take as long to cook as I thought it would. I think it took me longer to chop all the veggies up! We still need to put a small bead of clear silicone between the backsplash tile base and the granite countertops to protect it from water seeping behind all our hard work. Then I promise to post pictures and DIY tips.

This weekend we are headed to the mountains! Kyle is running a half marathon plus (14.7 miles) up and down the ski slopes of Vail. He will gain 5500 ft. in elevation! Although this sounds nuts, I know he's going to do awesome! Plus we get to enjoy Vail in the Summertime!

Anyways... I have to share this recipe since I am in the kitchen again!

One Pot Thai Curry

- 1 1/4 lb chicken, cut into strips
- 1 medium red pepper, cut into strips
- 1 medium green pepper, cut into strips (I only had a red one)
- 1 small onion, cut into strips
- 1 cup eggplant, diced
- 2 tbsp. sesame oil, divided
- 2 tbsp. olive oil
- 2 tbsp. fresh ginger, chopped (I used the kind in the tube)
- 1 tbsp. fresh garlic, minced
- 1 can unsweetened coconut milk (I used lite)
- 1/2 cup low sodium chicken stock
- 2 tsp. fish sauce (I used duck sauce, couldn't find fish sauce)
- 2 tsp. sugar
- 2 tbsp. heaping of red curry
- fresh basil, cut into strips
- lime slices for garnish
- salt and pepper to taste
*- bamboo shoots (optional)
*- portabello mushrooms, sliced (optional)

1. In a large pot, heat 1 tbsp. of sesame oil and the olive oil over medium heat. Add ginger and garlic, 2-3 minutes.
2. Add the chicken and cook until no longer pink, about 6 minutes. Remove the chicken from the pot and set aside.
3. Add the other tbsp. of sesame oil and the vegetables. Cook until soft and fragrant, about 6-8 min.
4. Return the chicken to the pot and add the coconut milk, chicken stock, fish sauce, sugar, and Thai curry paste. Blend well and allow to simmer for 5 minutes.
5. Before serving, add the basil. Serve over rice.

 Ingredients (bamboo shoots can not pictured)

 Cooked ginger/garlic chicken

 Sautéing the vegetables

Curry served over rice!

Enjoy!
Brittney


Wednesday, July 16, 2014

Homemade NO Churn Peach Ice Cream

Summer and ice cream seem to go hand in hand. And homemade ice cream that you don't need an actual machine to make it with is even better! I follow Picky Palate Blog and she made this ice cream and I had to try it. It is soooo good! It tastes like apple pie in ice cream, only made with peaches. I hope you try it out!

Homemade NO Churn Peach Ice Cream

- 2 peaches, diced
- 3 tbsp. brown sugar, packed
- 3 tbsp. butter
- 1/2 tsp. cinnamon
- 1 tsp. vanilla
- 1 cup heavy whipping cream
- 7 oz. sweetened condensed milk
- 3 sheets graham crackers, crushed

1. In a skillet over medium heat, cook peaches with brown sugar, cinnamon, and butter for about 5 minutes until soft.
2. With your KitchenAide mixer, whip your heavy whipping cream until peaks form.
3. In a separate bowl, combine sweetened condensed milk and vanilla. Slowly fold in whipped cream.
4. Gently fold in graham crackers and peaches.
5. Place in a temperature proof container and freeze overnight (I used a loaf pan).

 Fresh Peaches

 Peaches, butter, cinnamon and brown sugar

Softened peaches

 Whipped Cream

 Sweetened condensed milk and vanilla

 Adding graham crackers

 Ice cream in container about to go into the freezer

Delicious homemade ice cream!

Enjoy!
Brittney

Monday, July 14, 2014

Loaded Blue Corn Tortilla Nachos

Everyone in my family loves chips. Not sure who doesn't love chips out there... but these are fairly healthy chips that you can eat for dinner! I bought Tostitos Simply Blue Corn Tortilla Chips and a bunch of fresh toppings to put on our nachos. I even browned some ground beef with taco seasoning to add as well. I hope you enjoy this meal!

*Feel free to add anything you want that I didn't include like black beans, avocado, sour cream, guacamole, red onions... the possibilities are endless!

Loaded Blue Corn Tortilla Nachos

- 1 lb. ground beed, browned and fat drained
- taco seasoning
- blue corn tortilla chips, one bag
- shredded cheese, I used Mexican mix
- tomato, chopped
- onion, chopped
- corn
- salsa

1. Preheat oven to 350 degrees. Line a baking sheet with foil and spray with non-stick spray.
2. Empty bag of chips on the baking sheet and spread them out.
3. Place your desired toppings on your chips.
4. Bake for 15 minutes.

Left: Blue Corn Chips, Right: Chips with taco meat and cheese

 Baked Blue Corn Loaded Nachos

Chips for Dinner!

Enjoy!
Brittney

Thursday, July 10, 2014

Korean Beef

I've been slacking in my posts because this week our granite countertops and new sink were installed - so my house is a mess! But we LOVE our new countertops and I actually enjoyed not doing dishes for about 24 hours while the new sink dried. This weekend we will start on the white subway tile backsplash. So excited to see our kitchen transforming into a beautiful space (I've been watching too much HGTV...).

The night before our countertops were installed I made Korean Beef. It is so easy and so tasty that there were zero leftovers... we will be making this again and again!

Korean Beef

- 1 lb. ground beef
- 1/2 tsp. ginger
- 1/4 cup soy sauce
- 1/4 cup brown sugar
- 1 tbsp. sesame oil
- 3 cloves garlic, minced
- salt and pepper
- bunch of green onions, chopped
*- 1/2 -1 tsp. crushed red peppers (optional)
- brown rice, cooked

1. Brown your ground beef in a skillet over medium heat with garlic and sesame oil. Drain the fat.
2. Mix ginger, soy sauce, salt and pepper, brown sugar together.
3. Add sauce to the meat. Allow to simmer. Add green onions or use as garnish.
4. Serve over brown rice.

Browning meat

 Soy Sauce mixture

Korean Beef over rice

Here is a sneak peak of our granite! I will probably wait to post pictures of everything once the backsplash is up since the two different paint colors is an eye-sore at the moment...

 New Granite! Courtesy of Lowe's

New sink and working faucet!

Enjoy!
Brittney